izumo
Open Menu
Fabric Mods > Mod Install Guide (Default Launcher)
Before you start, make sure you have previously run the vanilla version of Minecraft that you are going to install the mods for, which in this case would be 1.19. You need to do this so that the launcher can download all the asset files that it needs to, as it won't be able to do so using the modloader profile. fabric-installer-0.11.0.jar (links directly to fabricmc.net)

Mod Install Guide (Default Launcher)
Whether you're new to modding or just want to make sure you do it right, everything you need is here.Before you start, make sure you have previously run the vanilla version of Minecraft that you are going to install the mods for, which in this case would be 1.19. You need to do this so that the launcher can download all the asset files that it needs to, as it won't be able to do so using the modloader profile.
Instructions
First, download the universal Fabric installer.
 fabric-installer-0.11.0.jar (links directly to fabricmc.net)
If prompted to update the installer, it doesn't matter whether you do or not because you're going to be downloading the same version of Fabric anyway.
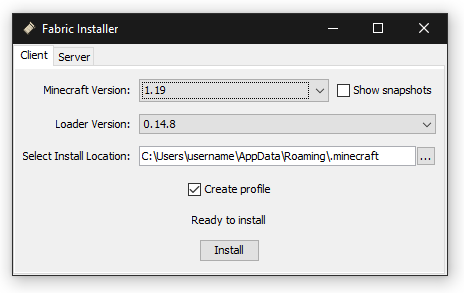
Second, set up the Fabric installer.
Open the .jar file and make sure:
The Minecraft version is set to 1.19;
The Loader version is set to 0.14.8 (compatiability reasons);
The install location is correct.

͏͏͏Third, finalize installation.
If you currently have the Minecraft launcher open, close it now. If you do not close the launcher before attempting to install then the launcher profile will not be created properly.
Make sure 'Create profile' is checked and the versions are correct, and click Install.
Once the installation is complete, you can close the installer.
Fourth, open the mods folder.
Open file explorer and type %appdata% in the address bar.
Open the '.minecraft' folder, which should be at the top.
Now open the 'mods' folder. If it's not there, create a new folder and name it 'mods' exactly.
If there are mods already in your mods folder, you need to remove them. The only mods that are in there should be the ones for the version that you are currently running.
Fifth, install the mods.
Extract the mods.zip file and move all four mods into your empty mods folder.
You can now close file explorer.
Finally, you can now open your Minecraft launcher and the selected profile should be Fabric 0.14.8 for MC 1.19.
The mods are now installed. You can launch Minecraft.